LENSEC Integration
Integration Summary
VMS Partner | Product | Version | Last Tested BriefCam Version | Integration Level | H.265 Support |
LENSEC | Perspective VMS | 6.1.x.0 | 2025 R1 SP1 (Classic engine) | Real time alerts integration (L2a) only | Yes |
LENSEC | Perspective VMS | 6.0.x.0 | 2024 M1 HF2 (Classic engine) | Real time alerts integration (L2a) only | Yes |
Important
Certification policy note: Official certification applies to major and minor versions. Maintenance versions are not part of the certification process. However, versions 6.1.1.0, 6.1.2.0, and 6.1.3.0 have been tested and verified as stable.
LENSEC 6.1.x.0 Integration
Required ports
The following ports should be available when installing the plugin.
Default port | Description |
|---|---|
80 | General communication with VMS Server |
554 | Camera service stream port – RTSP live streaming from the VMS |
None | Event connector port – for receiving alerts from BriefCam, defined by the user |
Adding the Lensec VMS as a Directory in BriefCam
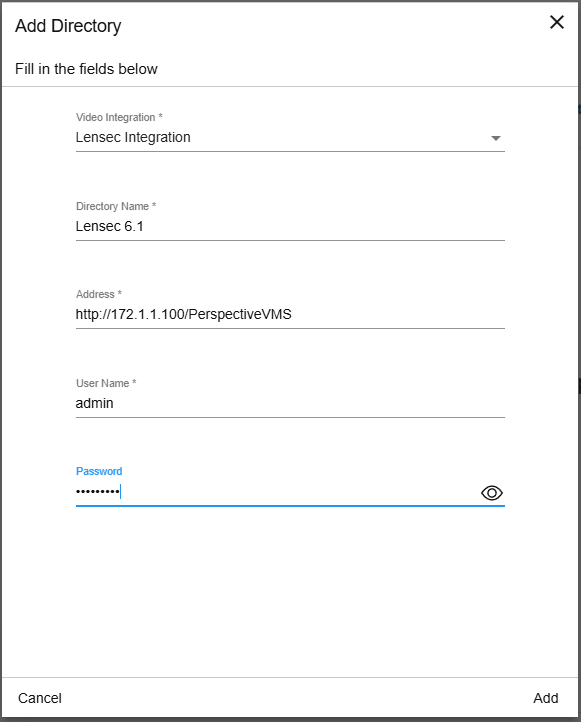
From the Video Integration field, select .
In the Directory Name field, enter a display name for the user directory.
Enter the VMS address. The VMS address is the URL to the VMS –
http(s)://{VMS-Server-Address}/{VMS-Endpoint}. The VMS endpoint is configurable during the installation. The default isPerspectiveVMS, for example:http://172.1.1.100/PerspectiveVMS.Enter the administrator's user name.
Enter the password for the administrator user.
Enable Sending of Alerts to the VMS (L2a)
STEP 1. Creating the BriefCam connector
This connector is used to receive all alerts sent by BriefCam
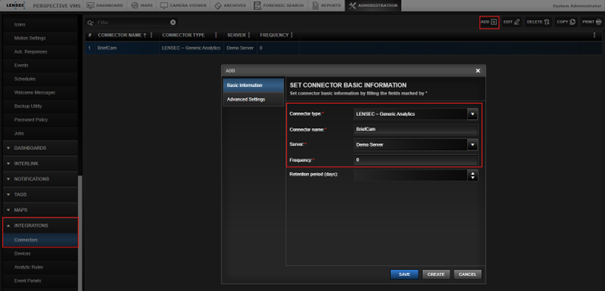
Open the VMS Administration.
Navigate to > .
Click to add a new connector.
In the Connector type field, select .
In the Connector name field, enter
BriefCam.In the Server field, select a server that will receive the alerts.
Set the Frequency field to .
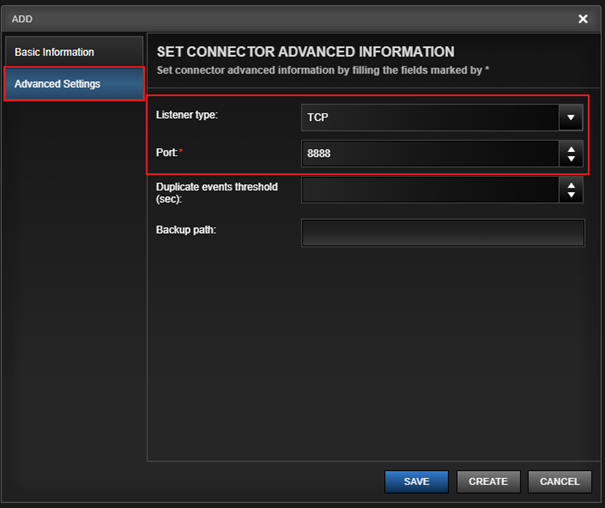
Navigate to Advanced Settings.
Set the to .
In the Port field, enter the port that will be used for receiving alerts from BriefCam.
Click .
After the connector is successfully created, the port will be opened by the VMS.
Ensure this port is opened to the BriefCam machine.
STEP 2. Creating the Camera Analytic rules
For each camera that will receive alerts from BriefCamBriefCam, an Analytics Rule needs to be created.
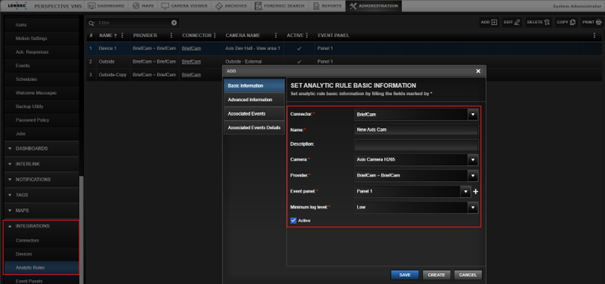
Navigate to > .
Click .
From the list, select .
In the Name field, enter a name for the analytic rule.
In the Camera field, select the camera that will be used when the rule is triggered.
From the list, select .
From the list, select a panel where the alerts will be shown.
From the Minimum log level field, select the required log level, depending on user needs.
Set the rule as .
Navigate to Advanced Information.
In the Camera Id field, enter the ID for the previously selected camera (in step 5).
In the Provider IP field, enter the IP address of the BriefCam server that will send the alerts.
If the server is on a different network than the VMS, the VMS Network Gateway address needs to be used instead of the server address.
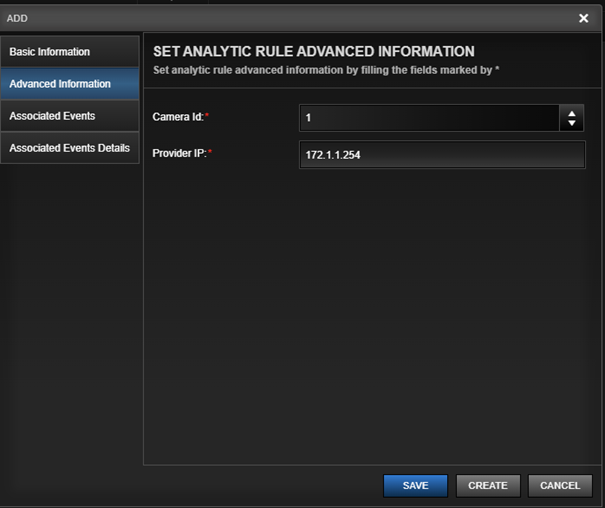
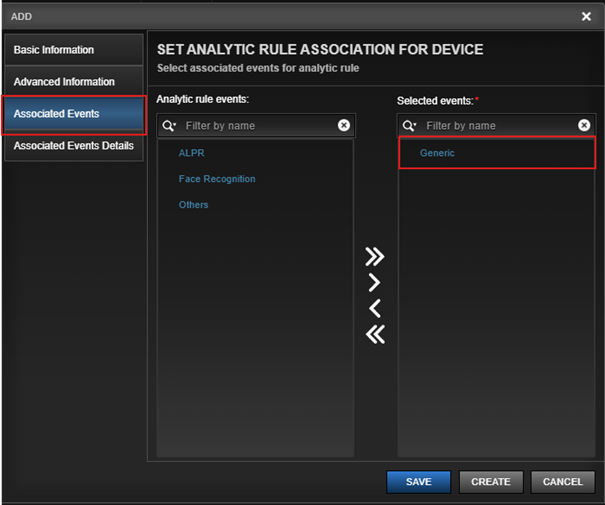
Navigate to Associated Events.
Add to .
Click .
L2a Setup in BriefCam
To enable the sending of alerts:
In the BriefCam Administrator Console, open the Settings tab.
Set the Respond.AlertsPublishingEnabled environment setting to .
Save the value.
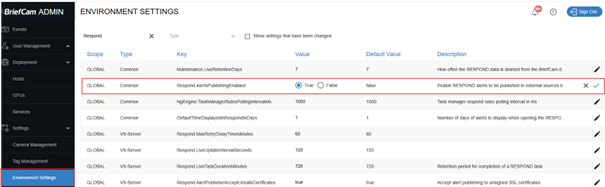
Open the
BriefCam.LensecIntegration.iniconfiguration file (located atC:\Program Files\BriefCam\BriefCam Server\plugins).In the AlertsHTTPPort parameter, enter the BriefCam connector's port.
Remove the semicolon from the beginning of the row.
Save the file.
Restart the VSServer service.
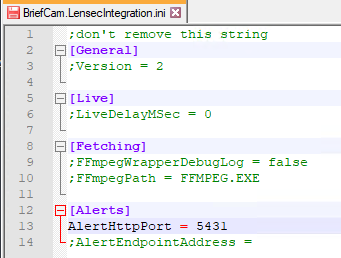
The AlertendpointAddress parameter defaults to the server address set up in the BriefCam directory.
If the alerts need to be sent to another VMS server, enter the server address in the AlertendpointAddress parameter and enable it (by removing the semicolon at the beginning of the row).
The AlertEndpointAddressURLformat is the same as the format needed for the BriefCam directory: http(s)://{VMS-Server-Address}/{VMS-Endpoint}.
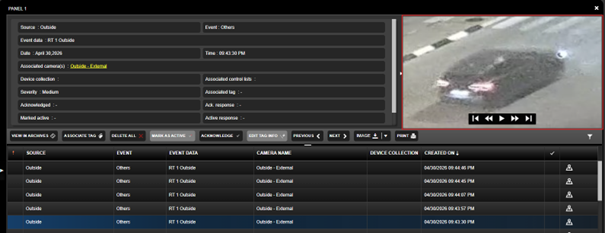
When alerts are sent to the VMS, the metadata includes a hyperlink to thumbnails generated by BriefCam.
These thumbnails are generated and located in the BriefCam shared folder.
The VMS machine needs to have access to the BriefCam shared folder in order to display these thumbnails properly.
If the VMS does not have access to the BriefCam shared folder, it will generate thumbnails based on the alert time, from its own recorded video.
For L1 (on-demand processing), motion detection recordings are not supported. Only constant recordings are supported.
LENSEC 6.0.x.0 Integration
Prerequisites
To view BriefCam alerts in Lensec, the Lensec user needs to be part of an operator group (on the Lensec VMS) at a minimum.
Installation Steps
From the BriefCam Administrator Console, stop all currently running services.
Check "Programs and Features" to confirm that the Lensec plugin is not already installed.
Run the downloaded BriefCam Lensec plugin.
Open the
Briefcam.LensecIntegration.inifile (located atC:\Program Files\BriefCam\BriefCam Server\plugins) and change theFFmpegPathsetting to:C:\Program Files\BriefCam\BriefCam Server\FFmpeg.exe. Save the changes.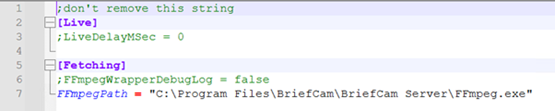
Add the Lensec Integration to BriefCam:
In the BriefCam Administrator Console, open the Settings tab and click Camera Management.
Click the Add Directory button.
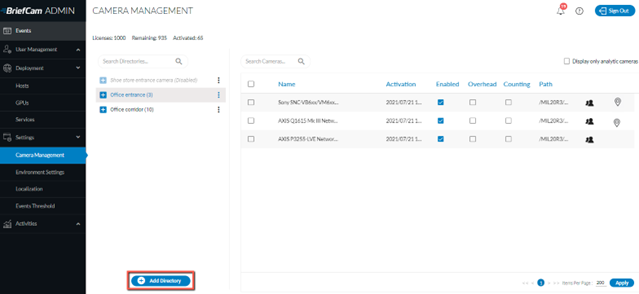
From the Video Integration field, select Lensec Integration.
In the Directory Name field, enter a display name for the user directory.
In the Address field, enter the Lensec server address, for example: 172.1.1.111.
In the User Name field, enter, for example: admin.
In the Password field, enter a password of up to 12 characters, for example: Tadmin#.
Click Add.
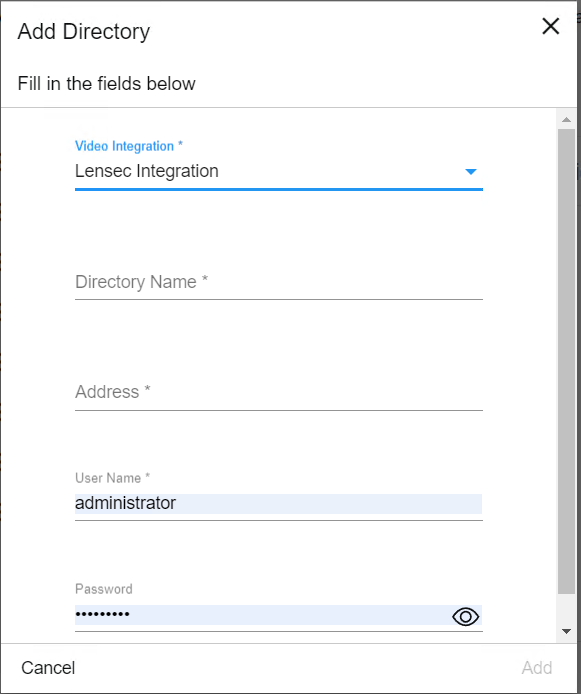
In the Add/Edit Cameras screen, activate the desired Lensec cameras.
Restart all BriefCam services.
On the Windows machine, restart Internet Information Services (IIS).
From the BriefCam Administrator Console, make sure that all services are running properly.