LenelS2 OnGuard Integration
Integration Summary
VMS Partner | Product | Version | Last Tested BriefCam Version | Integration Level | H.265 Support |
LenelS2 | OnGuard | 8.2 | 2024 R2 (including Classic and Next-Gen engine) | Real time alerts integration (L2a) only | N/A |
LenelS2 | OnGuard | 8.1 Cloud | 2024 R2 HF4 (including Classic and Next-Gen engine) | Real time alerts integration (L2a) only | N/A |
LenelS2 | OnGuard | 8.1 | 2024 R2 HF4 | Real time alerts integration (L2a) only | N/A |
LenelS2 | OnGuard | 8.0 | 2024 R2 HF4 (including Classic and Next-Gen engine) | Real time alerts integration (L2a) only | N/A |
Prerequisites
The LenelS2 OnGuard API license should be installed on the Lenel side. For more information, see: https://www.lenels2.com/en/security-solutions/third-party-integration/oaap-partners/briecam-video-analytics-platform/.
The Video Analytics Platform API requires a LenelS2 OnGuard API license and has a unique part number. Contact your LenelS2 Value Added Reseller for pricing.
Receiving BriefCam Alerts
This section explains how to get alerts from BriefCam to your OnGuard® access control system.
Right-click on the
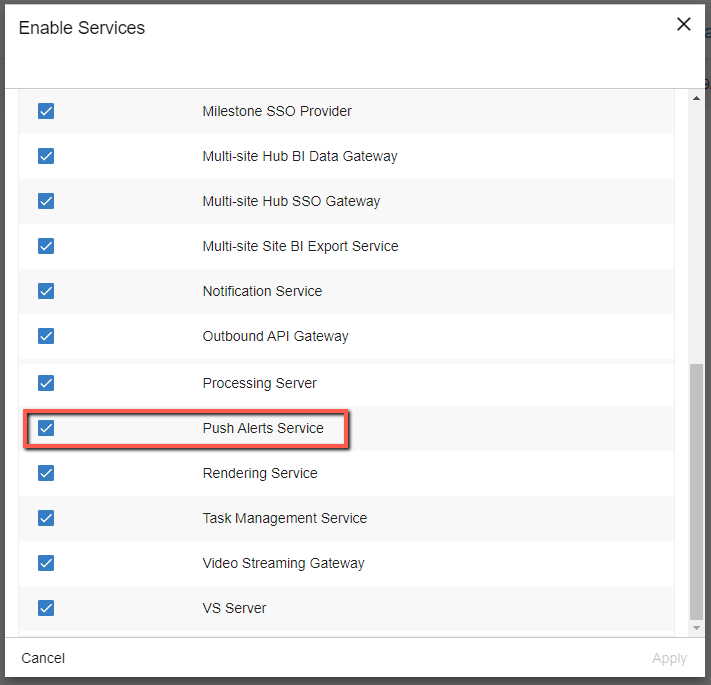
BriefCamLenelS2OnGuardPlugin.exefile and select Run as administrator. The installation path for the plugin is:{BriefCam Server Folder}\PushAlertsService\plugins\. After successful installation there will be a new folder createdLenelS2OnGuardinside thepluginsfolder.In the BriefCam Administrator Console, open the Hosts screen and click on the host’s settings icon
 .
.Check the Push Alerts Service checkbox and click Apply.
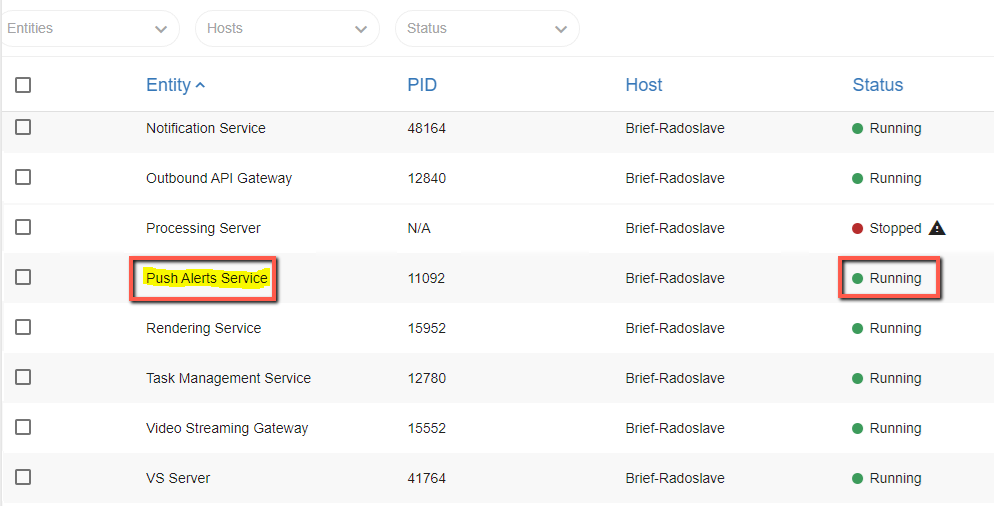
Open the Services screen and make sure that the Push Alerts Service is set to Running.
From the Environment Settings screen, search for the text: PushAlertsService.
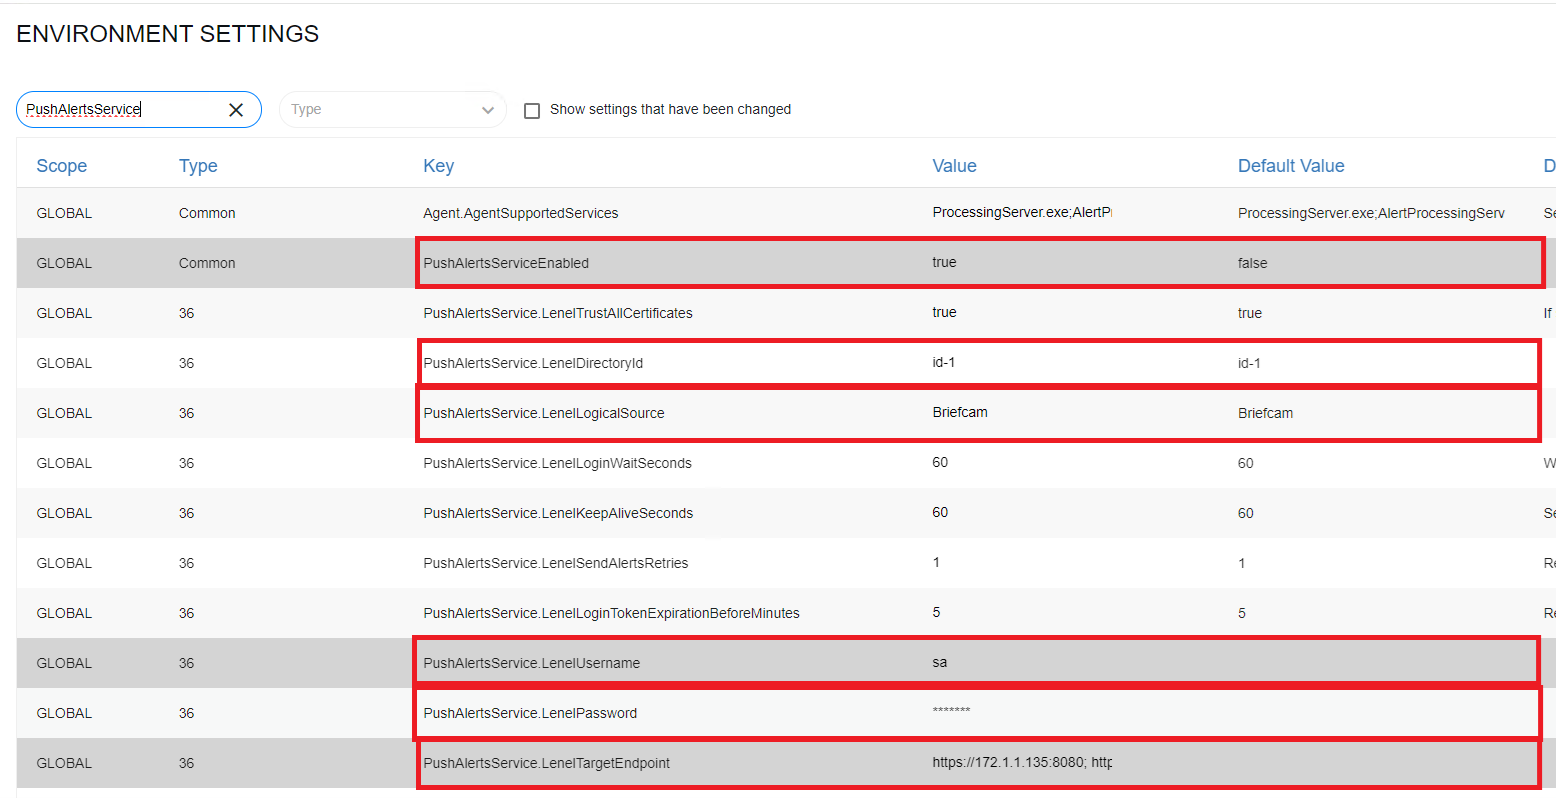
Update the following environment settings:
PushAlertsServiceEnabled – Set to true.
PushAlertsService.LenelDirectoryId – Enter the OnGuard directory ID. To get a list of the different Lenel Directories, use the following URL to retrieve a list of directory ids: https://OnGuard_server_address:OnGuard_port/api/access/onguard/openaccess/directories?version=1.0
For example: https://172.1.1.245:8080/api/access/onguard/openaccess/directories?version=1.0
PushAlertsService.LenelLogicalSource – Select the logical source if it is different than the default value (Briefcam).
PushAlertsService.LenelUsername – Enter a user created in the Lenel system.
PushAlertsService.LenelPassword – Enter the user’s password. The value is protected by displaying asterisks only.
Note that OnGuard credentials (the username and password above) should be the same on all OnGuard instances, if there are multiple instances set up in the PushAlertsService.LenelTargetEndpoint environment setting.
PushAlertsService.LenelTargetEndpoint – Enter the OnGuard instance/instances where alerts will be sent followed by a colon (:) and the OnGuard port. If multiple OnGuard instances are setup, the addresses need to be separated by a semicolon (;). In addition, a pool will be created of available instances, where users can map RESPOND rules. The addresses of the OnGuard instances in this setting should match the ones mapped in the
EndpointRuleMapping.jsonfile.Single instance example: "https://{OnGuardAddress}:8080"
Multiple instance example: https://{OnGuard1Address}:8080; https://{OnGuard2Address}:8080; https://{OnGuard3Address}:8080;"
From the BriefCam Administrator Console, restart the Push Alerts Service. This reloads the configuration of the environment settings.
Set Up Endpoint Rule Mapping
By default the Push Alert Service will not send alerts to the pool of OnGuard instances.
To send alerts to an OnGuard instance, the Rule Name and the OnGuard instances need to be mapped.
This is done in the LenelS2OnGuard.EndpointRuleMapping.json file located in the LenelS2OnGuard Plugin directory.
The file is structured with key-value pairs ("key": "value") where:
Key – Name of the RESPOND rule
Value – List of OnGuard endpoints (one or multiple)
For example:
{ "RespondRule1": [ "OnGuardInstanceEndpoint1", "OnGuardInstanceEndpoint2", "OnGuardInstanceEndpoint3" ], "RespondRule2": [ "OnGuardInstanceEndpoint1", "OnGuardInstanceEndpoint5" ], "RespondRule3": [ "OnGuardInstanceEndpoint2" ] }

 |
After the mapping in the json file is updated, the Push Alerts Service needs to be restarted, in order for the new configuration to reload.
Once started with the rule mapping, the Push Alerts Service will send the alerts from each mapped RESPOND rule to the respectively mapped OnGuard instance endpoints.
The OnGuard instance endpoints should match the ones set up in the PushAlertsService.LenelTargetEndpoint environment setting.
If the endpoint is mapped in the Mapping file and not in the PushAlertsService.LenelTargetEndpoint environment setting, an error will be displayed in the PushAlertService.log file.
Create an OnGuard Logical Source
A BriefCam Logical Source needs to be created on each OnGuard instance that will receive alerts from BriefCam. This is needed for mapping incoming alerts.
To create an OnGuard logical source:
Log in to the OnGuard System Administration application.
From the Additional Hardware menu, select Logical Sources.
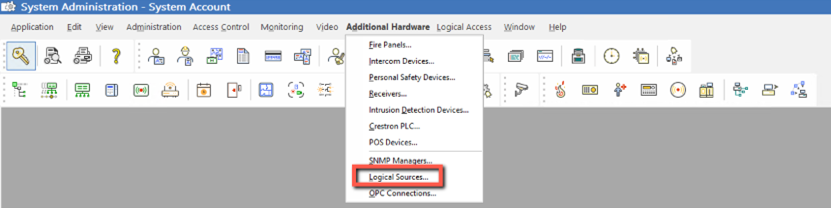
Create a Logical Source named
BRIEFCAMand click the Add button.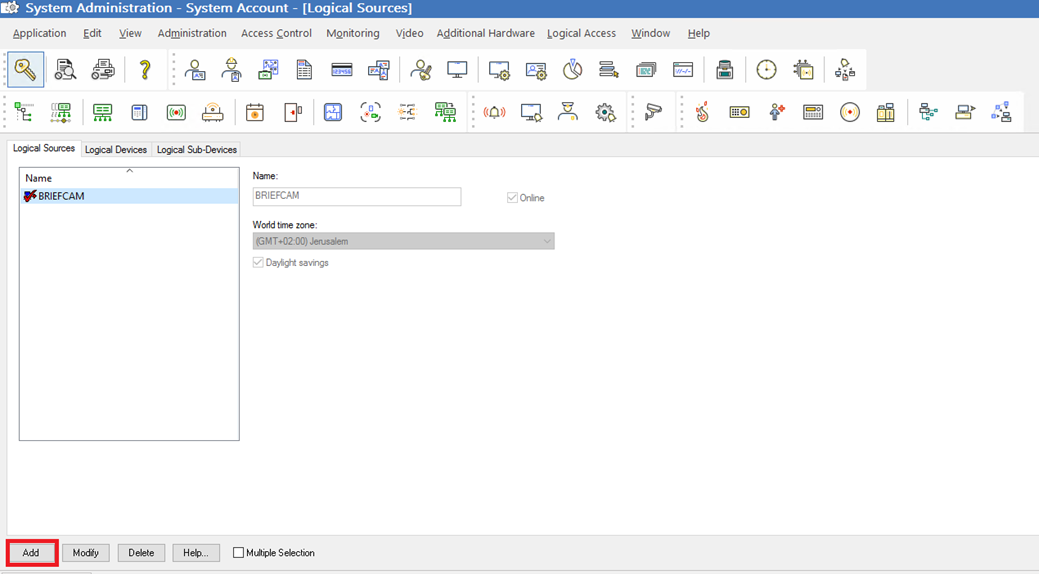
Create an OnGuard Logical Device
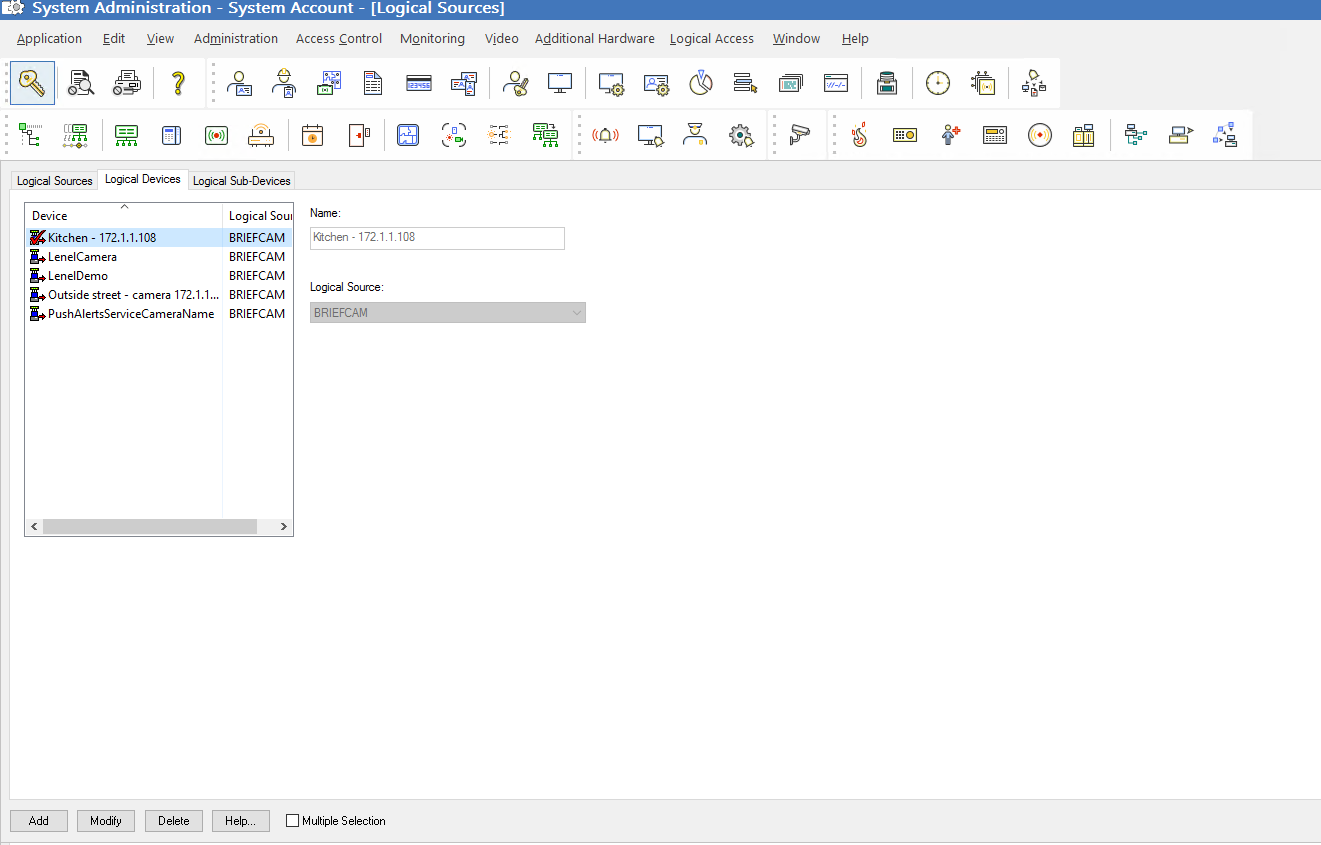
Logical devices need to be created for each camera that will be used for RESPOND rules that generate alerts and are being sent to OnGuard instances.
This means that depending on the mapping between RESPOND rule and OnGuard instance endpoints, logical devices need to be created on the OnGuard instances that are receiving the RESPOND alerts.
For each RESPOND rule alert sent, the target endpoint should have the Rule Camera Name set up as a logical device under the BRIEFCAM logical source.
To create an OnGuard logical device:
Log in to the OnGuard System Administration application.
From the Additional Hardware menu, select Logical Sources.
Open the Logical Devices tab.
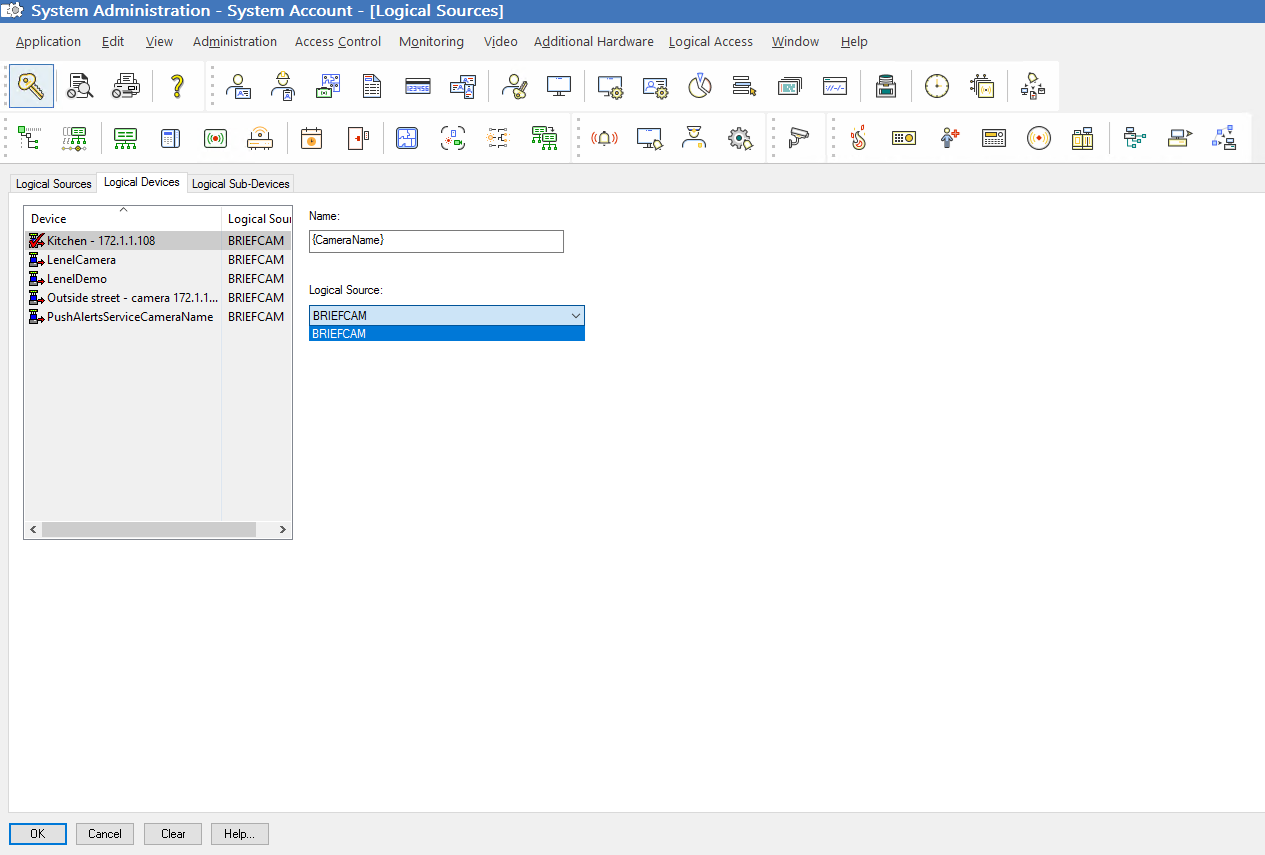
In the Name field, set the name of the logical device to the desired camera name. Note that the camera name should be the same as is in the VMS.
From the Logical Sources field, select the
BRIEFCAMlogical source.Click the Add button.