カメラとVMSの設定
この部分は、外部VMSシステムに接続されている製品BriefCamにのみ関連します。
[en] Connecting BriefCam to a VMS Server
[en] Make sure the appropriate VMS plug-ins are installed.
[en] Open the Camera Management section (see image below), which lists all connected VMS servers on the left and the servers’ associated cameras on the right.
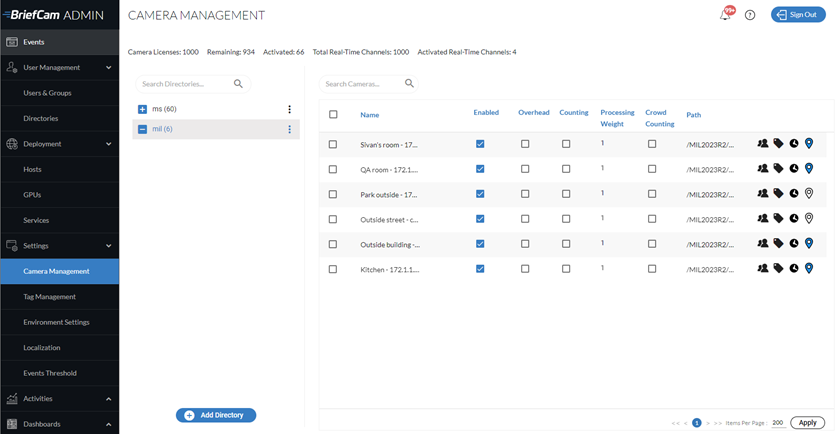
[en] Click the Add directory button to add a VMS server. The Add Directory dialog opens.
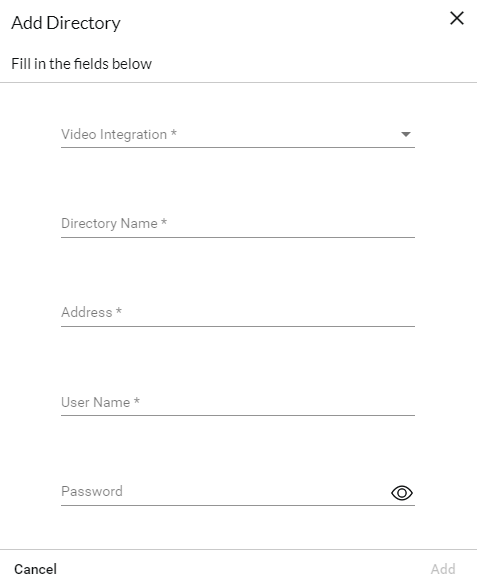
[en] From the Video Integration field, select the appropriate VMS integration option. Different integrations can be added by installing additional VMS-specific plugins.
[en] In the Directory Name field, enter a display name for the user directory. The directories should have different names.
[en] In the Address field, enter the VMS server’s IP/host address. If you are not using the default port (80), add the communication port (the port number may be specified as a suffix to the address, preceded by a colon).
[en] In the User Name and Password fields, enter the VMS server user name and password. This user must have permissions in the VMS to the cameras exposed for BriefCam. Click Add to add the directory.
[en] If you selected Milestone or Genetec, you will also see an RTSP Settings toggle button. These settings can be used to securely define the RTSP credentials for the integration.
[en] To test the connection to the newly added directory, click the zoom (
 ) icon to the right of a directory (VMS server) name and select the Test Connection option.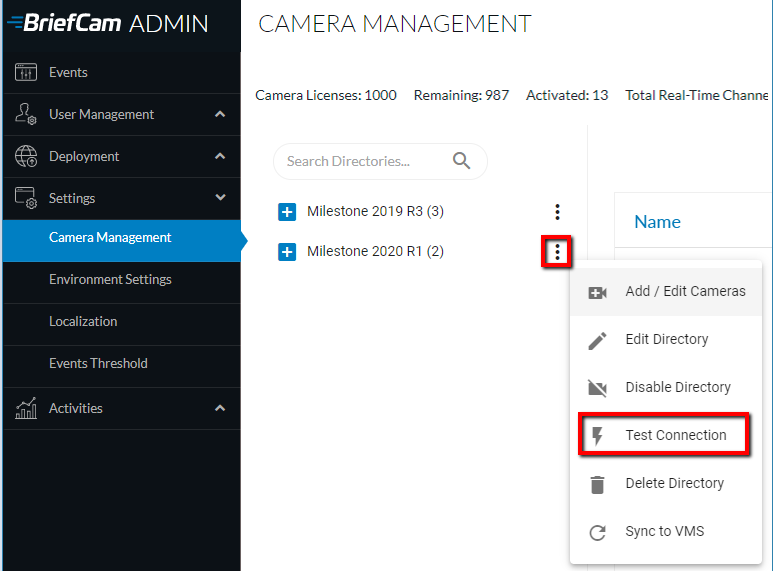
[en] To edit the directory, click the Edit Directory option. When changing the Address field, the new value must point to the existing directory.
[en] To completely disable all cameras associated with a directory, click the Disable Directory option. In a disabled directory, it is not possible to enable individual cameras. If you disable and then enable a directory, all of the associated cameras are also enabled.
[en] To completely remove a VMS directory (assuming that none of the cameras associated with it are currently activated), click the Delete Directory option.
注記
[en] Make sure to click the Apply button to retain any configuration changes.
注記
[en] When using a multi-site deployment (comprised of multiple site systems and a central Hub), video sources are set up in the Sites’ Administrator Consoles and not in the Hub Administrator Console.
カメラの選択と有効化
この時点で、個別または複数のカメラフィードを選択して有効または無効にすることができます(ライセンス条項に従います)。個々または複数のカメラフィードは、処理してビデオシノプシスを生成できます。
カメラを有効化するには、ディレクトリ(VMSサーバー)名の右側にあるズーム(
 )アイコンをクリックし、カメラの追加/編集オプションを選択します。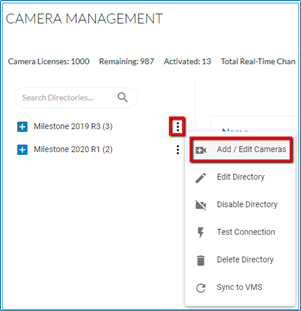
Camera Activation(カメラの認証)画面が表示され、選択したVMSディレクトリに関連付けられているカメラのリストが表示されます。
注記
カメラの認証は元に戻すことのできないプロセスです。一度完了すると、サポートで特別な承認リクエストが開かれない限り、アクティベーション数をリセットできまBriefCamせん。
アクティベートするすべてのカメラのActivated(アクティベート)列のチェックボックスを選択し、Activate(アクティベート)ボタン(右下隅にある)をクリックします。すでに認証されているカメラのチェックボックスはグレーで表示されます。
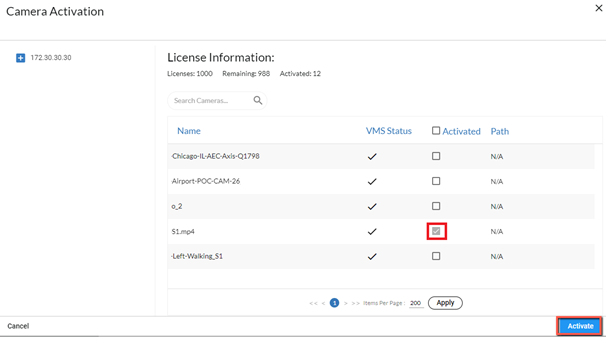
カメラを有効化する操作は元に戻せません。個々のカメラを無効にするには、ステータス列の有効/無効チェックボックスをチェックまたはチェックを外します。無効なカメラはWebクライアントに表示されBriefCamません。カメラ管理画面からカメラを有効/無効にすることもできます。
注記
VMSサーバーが使用できなくなった場合、VMSサーバーが再び使用できるようになってもBriefCam、カメラは自動的に認証されません。この問題を解決するには、AlertProcessingServicesを再起動します。
[en] Camera Configuration
[en] At the top of the screen, you can see the number of active and remaining camera licenses.
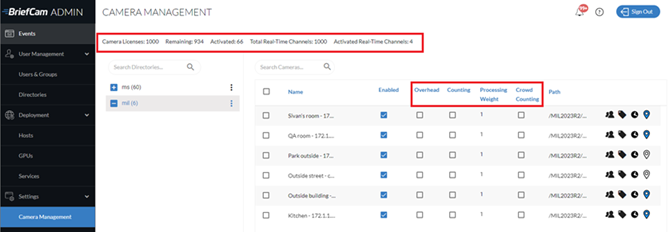
[en] This screen has the following columns:
[en] Overhead
[en] If the camera is set with an overhead angle or is an overhead fisheye camera and the camera is used with the Line Crossing feature, it is recommended to check the Overhead checkbox. This will improve the object extraction accuracy by running the algorithmic engine in a special processing mode that compensates for the warping that overhead cameras introduce. Note that only people are detected on cameras with the Overhead checkbox checked. Vehicles and animals are not detected. In addition, the only metadata generated for people detected in Overhead mode is colors.
[en] Counting
[en] If the camera is set with an overhead angle and is used for people counting, check the Counting checkbox for the cameras. This will improve the people counting accuracy by running the algorithmic engine in a special processing mode that reduces the amount of false object detections, which makes the counting more reliable. This Counting mode, which is available for the OX5 engine, is not the “people counting” feature. Note that vehicles are not detected on Counting cameras.
[en] Processing Weight
[en] The processing weight is how much of the total GPU Processing Capacity is expected to be consumed by this camera. The GPU’s processing capacity is defined in the GPUs screen.
[en] Note that the weighting system only applies to real-time processing. All on-demand tasks are treated as having a processing weight of 1.
[en] Crowd Counting
[en] Crowd counting is only supported for the Linux-based Next-Gen (OX6) engine.
[en] Select the Crowd Counting checkbox to enable the collection of crowd counting data for groups of more than 50 people, by default. This number is configurable using the HeadCount.CrowdCountingThreshold environment setting. The value you enter in this setting appears in the user interface with one more than the entered value (for example, if you enter 60, 61 will appear in the user interface).
[en] By default, crowd counting data is not collected from the camera.
[en] Note that:
[en] Only the Area filter is available with the Crowd Counting filter.
[en] Enabling Crowd Counting on a camera will cause existing rules for that camera to stop sending alerts. Therefore, it is recommended to disable or delete all existing rules for the camera before enabling Crowd Counting.
[en] Disabling Crowd Counting on a camera will turn existing Crowd Counting rules for that camera into People Counting rules. Therefore, it is recommended to disable or delete all existing rules for the camera before disabling Crowd Counting.
[en] Instant REVIEW mode is not supported for Crowd Counting cameras.
[en] Camera Management icons
[en] This screen has the following icons:
[en] Icon | [en] Description |
 | [en] Set permissions for the cameras. See: カメラの権限. |
 | [en] Assign tags to the camera. See: カメラにタグを割り当てる. |
 | [en] Set a time zone. This is only for use in multi-site environments. See: カメラにタイムゾーンを割り当てる. |
 | [en] Set coordinates for outdoor cameras for use in the Cameras view and Fast Track. You can hover over the icon to see a tooltip with the coordinates. Geo-location available in Milestone (all supported versions) and Genetec (v5.8 and above) are automatically set here. You can override the Milestone and Genetec coordinates by clicking on the icon and editing the coordinates. Coordinates can also be set in the BriefCam client. Note that カメラとVMSの同期 will override manually added coordinates. |
 | [en] Hover over this to see the activation time and last modified time information. |
[en] Filtering Cameras
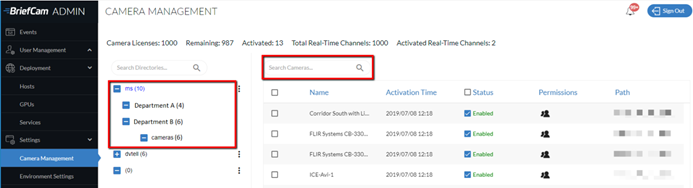
[en] There are two ways to filter the list of cameras.
[en] Use the directory tree on the left to drill down to the camera you are searching for.
[en] Use the Search field to narrow the list even further. The search will search the camera name, camera ID, and tags.
カメラ名の変更
カメラ名を変更した場合は、カメラを再定義して再度有効にする必要があります。
カメラの交換
製造中止または破損したカメラは、次のように交換できます。
新しいカメラをVMSに接続し、製造中止または破損したカメラと同じカメラ名を付けます。
から、BriefCam Administrator Console Sync to VMS(VMSに同期)をクリックします。
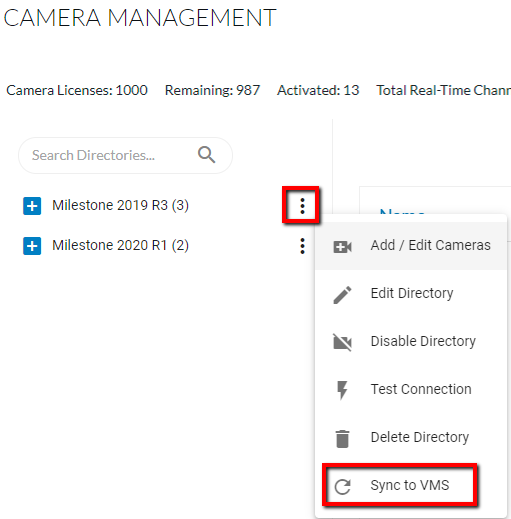
BriefCamは交換されたカメラを特定し、有効化します。
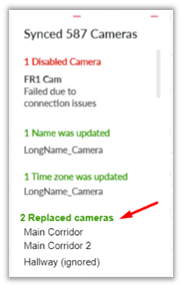
BriefCamは、交換されたカメラの既存の設定をすべて保持します。
リアルタイムタスクを含むルールと参照元が処理を再開するには、BriefCam Administrator Console内のAlert Processing ServerとVSServerサービスを再起動します。