Backups
Important
Backups are the customer’s responsibility, and the integrator can help design a backup strategy to meet the customer’s needs and environment.
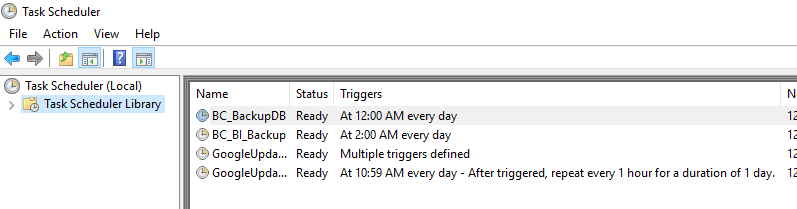
Daily backups are carried out automatically at midnight and 2 AM for Research and MongoDB.
The database and MongoDB are backed up to: \\server\Briefcam\ServerData\Backups.
The RESEARCH backup files are saved to: \\server\Briefcam\ServerData\Backups\RESEARCH.
Backups for High-Availability and/or Large-Scale Systems
For high-activity systems, it is best to schedule the backup while the system is idle (e.g. weekends). If that is not possible, replication to another server is the right solution.
In systems where 24/7 processing is configured, the automatic backup may cause database timeouts. For these types of systems, it is recommended to contact BriefCam’s support to come up with a backup strategy that meets the customers’ requirements.
In general, in large-scale systems or when the system is operational 24/7 it is highly recommended to set up replication and disable the automatic backup scheduled tasks.
It is recommended to set up a different backup to another machine or copy the backups to a different machine.
The components that should be backed up are:
Component | What to Backup | Backup Method |
PostgreSQL database | Dump of database | Run the |
BriefCam shared folder – | The entire storage utilized by BriefCam | Disk mirroring, replication, RAID configuration, external backups |
BI data – | The QLIK data files | Run the |
MongoDB – only in large scale environments | The camera activation blobs | Contact BriefCam Support |
License data | The license activation file | The license activation file |
Configuration files of databases |
| Backup files to another server |
Load balancer |
| Backup files to another server |
IIS |
| Backup files to another server |
Changing the Backup Times
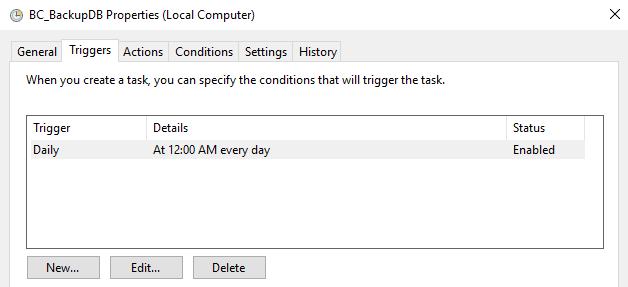
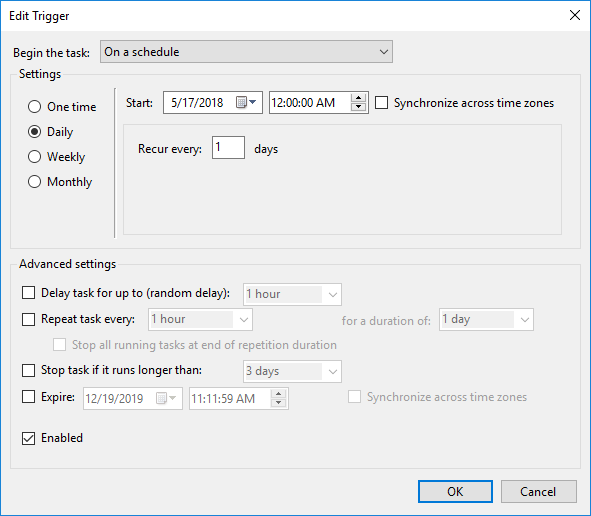
The scheduled backup times can be changed in the Windows Task Scheduler.
Double-click the backup task.
Click Edit.
Edit the schedule.
Changing the RESEARCH Backup Folder
To change the location of the RESEARCH backup after installation:
Open the
BI_Backupbatch script, which is located at:BriefCamServer\scripts\db\backup\.Change the value of the
BACKUP_PATHparameter.
Restoring the PostgreSQL Database Backups
Important
Before restoring the database, it is recommended to first contact the BriefCam Support team.
From the Windows services, stop the VSService.
To restore databases, run the following commands:
.\pg_dump.exe --no-password --verbose --blobs --format=c --file="<pg_dump_file.dump>" .\pg_restore.exe --verbose -d briefcam -U "<pg_superuser(dbadmin is the default)>" -h" <hostname>" -p <db port(5432)> "<pg_dump_file.dump>"Restart the services.
Restoring Database Backups of Research Dashboards (Qlik)
Run the scheduled backup task.
Copy the created files to the migration site.
Run the Research installer.
Stop all Qlik services.
Run only the repository database service (the PostgreSQL service).
Drop the fresh PostgreSQL db:
dropdb -h localhost -p 4432 -U postgres QSRCreate new PostgreSQL db:
createdb -h localhost -p 4432 -U postgres -T template0 QSRRestore the PostgreSQL db from the backup files:
pg_restore.exe -h localhost -p 4432 -U postgres -d QSR "c:\QSR_backup.tar"Copy the backed app share folder into the share folder.
Run the repository service in bootstrap mode:
repository.exe -bootstrap -standalone -restorehostnameAfter it finishes, run it again without -
restorehostname:repository.exe -bootstrap -standaloneLogin to the qmc with Firefox as <previousmachine>\bcuser.
Manually update the owner of all data connections’ user/password to the
<newmachine>\bcuserincluding the password (12 connections).Directly update the local BCUser to be the RootAdmin in the PostgreSQL db (table = users)
Directly update the user in the PostgreSQL:
<newmachine>\bcuser (table = ServiceClusterSettingsSharedPersistencePropertiesRun the reload tasks.
Restoring the MongoDB Backups
From the Windows services, stop the VSService.
Kill the session by running the Session Kill run command.
Restore the database by running the following command: PS> ./db-tool.exe restore-mongodb --backup-path "{backup directory path}" --no-auth -y
For example: PS> ./db-tool.exe restore-mongodb --backup-path "d:\my\mongo\bak\briefcam_mongodb_backup_2022-03-31_09-52-37" --no-auth -y
The parameters for the command are:
--backup-path | Backup directory path |
--no-auth | Do not use authentication. Currently this is the only option. |
-y, --yes | Confirm the restore. If this is not added, a confirm message will appear. |
-help | Display the Help text and exit. |
Note:
The restore operates only on the collections that exist in the specific backup directory.
If a collection to be restored already exists it will replaced by the backed-up version.
Indexes are also restored.