

Configuring Milestone Interconnect
This section describes Milestone Interconnect and how to configure the feature.
Selecting Milestone Interconnect or Milestone Federated Architecture (explained)
In a physically distributed system where users on the central site need to access the video on the remote site, you can choose between Milestone Interconnect™ or Milestone Federated Architecture™.
Milestone recommends Milestone Federated Architecture when:
- The network connection between the central and federated sites is stable
- The network uses the same domain
- There are fewer larger sites
- The bandwidth is sufficient for the required use
Milestone recommends Milestone Interconnect when:
- The network connection between the central and remote sites is unstable
- You or your organization want to use another XProtect product on the remote sites
- The network uses different domains or workgroups
- There are many smaller sites
Milestone Interconnect and licensing
To run Milestone Interconnect, you need Milestone Interconnect camera licenses on your central site to view video from hardware devices on remote sites. Only XProtect Corporate can act as a central site.
The status of your Milestone Interconnect camera licenses are listed on the License Information page of the central site.
Milestone Interconnect (explained)
Available functionality depends on the system you are using. See https://www.milestonesys.com/solutions/platform/product-index/ for more information.
Milestone Interconnect™ allows you to integrate a number of smaller, physically fragmented, and remote XProtect installations with one XProtect Corporate central site. You can install these smaller sites, called remote sites, on mobile units, for example, boats, busses or trains. This means that such sites do not need to be permanently connected to a network.
The following illustration shows how you could set up Milestone Interconnect on your system:
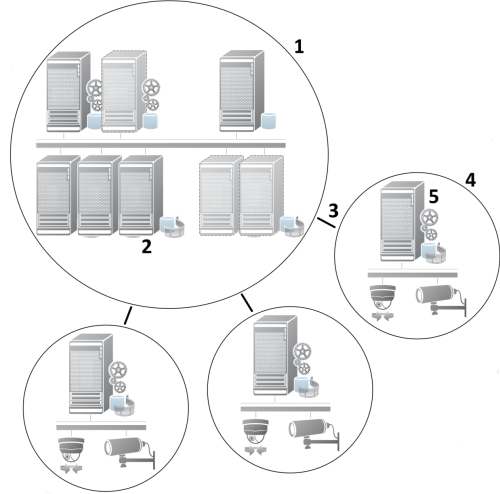
- Milestone Interconnect central XProtect Corporate site
- Milestone Interconnect drivers (handles the connection between the central sites' recording servers and the remote site, must be selected in the list of drivers when adding remote systems via the Add Hardware wizard)
- Milestone Interconnect connection
- Milestone Interconnect remote site (the complete remote site with system installation, users, cameras and so on)
- Milestone Interconnect remote system (the actual technical installation at the remote site)
You add remote sites to your central site with the Add Hardware wizard from the central site (see Add a remote site to your central Milestone Interconnect site).
Each remote site runs independently and can perform any normal surveillance tasks. Depending on the network connections and appropriate user rights (see Assign user rights), Milestone Interconnect offers you direct live viewing of remote site cameras and play back of remote site recordings on the central site.
The central site can only see and access devices that the specified user account (when adding the remote site) has access to. This allows local system administrators to control which devices should be made available to the central site and its users.
On the central site, you can view the system's own status for the interconnected cameras, but not directly the state of the remote site. Instead, to monitor the remote site, you can use the remote site events to trigger alarms or other notifications on the central site (see Configure your central site to respond to events from remote sites).
It also offers you the possibility to transfer remote site recordings to the central site based on either events, rules/schedules, or manual requests by XProtect Smart Client users.
Only XProtect Corporate systems can work as central sites. All other products can act as remote sites including XProtect Corporate. It differs from setup to setup which versions, how many cameras, and how devices and events originating from the remote site are handled - if at all - by the central site. For further details on how specific XProtect products interact in a Milestone Interconnect setup, go to the Milestone Interconnect website (https://www.milestonesys.com/solutions/hardware-and-add-ons/milestone-addons/interconnect/).
Milestone Interconnect setups (explained)
There are three ways to run Milestone Interconnect. How to run your setup depends on your network connection, how to play back recordings, and whether you retrieve remote recordings and to what degree.
In the following, the three most likely setups are described:
Direct playback from remote sites (good network connections)
The most straightforward setup. The central site is continuously online with its remote sites and the central site users play back remote recordings directly from the remote sites. This requires use of the Play back recordings from remote system option (see Enable playback directly from remote site camera).
Rule- or XProtect Smart Client-based retrieval of selected remote recording sequences from remote sites (periodically limited network connections)
Used when selected recording sequences (originating from remote sites) should be stored centrally to ensure independence from remote sites. Independence is crucial in case of network failure or network restrictions. You configure remote recordings retrieval settings on the Remote Retrieval tab (see Remote Retrieval tab).
Remote recordings retrieval can be started from the XProtect Smart Client when needed or a rule can be set up. In some scenarios, remote sites are online and in others, offline most of the time. This is often industry specific. For some industries it is common for the central site to be permanently online with its remote sites (for example a retail HQ (central site) and a number of shops (remote sites)). For other industries, like transportation, the remote sites are mobile (for example, busses, trains, ships, and so on) and can only establish network connection randomly. Should the network connection fail during a commenced remote recording retrieval, the job continues at next given opportunity.
If the system detects an automatic retrieval, or request for retrieval from the XProtect Smart Client, outside the time interval that you specified on the Remote Retrieval tab, it is accepted, but not started until the selected time interval is reached. New remote recording retrieval jobs will queue and start when the allowed time interval is reached. You can view pending remote recording retrieval jobs from System Dashboard -> Current Tasks.
After connection failure, missing remote recordings are by default retrieved from remote sites
Uses remote sites like a recording server uses the edge storage on a camera. Typically, remote sites are online with their central site, feeding it a live stream that the central site records. Should the network fail for some reason, the central site misses out on recording sequences. However, once the network is reestablished, the central site automatically retrieves remote recordings covering the down-period. This requires use of the Automatically retrieve remote recordings when connection is restored option (see Retrieve remote recordings from remote site camera) on the Record tab for the camera.
You can mix any of the above solutions to fit your organizations special needs.
Add a remote site to your central Milestone Interconnect site
You add remote sites to the central site with the Add Hardware wizard.
Requirements- Sufficient number of Milestone Interconnect camera licenses (see Milestone Interconnect and licensing)
- Another configured and working XProtect system including a user account (basic users, local Windows user or Windows Active Directory user) with rights for the devices that the central XProtect Corporate system should be able to access
- Network connection between the central XProtect Corporate site and the remote sites with access or port forwarding to the ports used on the remote sites
To add a remote site:
- On the central site, expand Servers and select Recording Servers.
- In the Overview pane, expand the relevant recording server and right-click.
- Select Add Hardware to start the wizard.
- On the first page select Address range scanning or Manual and click Next.
- Specify user names and passwords. The user account must be predefined on the remote system. You can add user names and passwords as needed by clicking Add. When ready, click Next.
- Select the drivers to use when you scan. In this case choose between the Milestone drivers. Click Next.
- Specify the IP addresses and port numbers you want to scan. Default is port 80. Click Next.
Wait while your system detects the remote sites. A status indicator shows the detection process. In case of a successful detection, a Success message appears in the Status column. If you fail to add, you can click the Failed error message to see why.
- Choose to enable or disable successfully detected systems. Click Next.
- Wait while your system detects hardware and collects device specific information. Click Next.
- Choose to enable or disable successfully detected hardware and devices. Click Next.
- Select a default group. Click Finish.
- After installation, you can see the system and its devices in the Overview pane.
Depending on the user rights for the selected user on the remote site, the central site gets access to all cameras and functions or a sub-set of them.
Assign user rights
You configure user rights for an interconnected camera as you do with other cameras, by creating a role and assigning access to functions.
- On the central site, in the Site Navigation pane, expand Security and select Roles.
- In the Overview pane, right-click the built-in administrator role and select Add Role (see Add and manage a role).
- Name the role and configure the settings on the Device tab (see Roles settings) and the Remote Recordings tab (see Roles settings).
Update remote site hardware
If the configuration has been changed on a remote site, for example, added or removed cameras and events, you must update the configuration on the central site to reflect the new configuration on the remote site.
- On the central site, expand Servers and select Recording Servers.
- In the Overview pane, expand the required recording server, select the relevant remote system. Right-click it.
- Select Update Hardware. This opens the Update hardware dialog box.
- The dialog box lists all changes (devices removed, updated and added) in the remote system since your Milestone Interconnect setup was established or refreshed last. Click Confirm to update your central site with these changes.
Establish remote desktop connection to remote system
You can connect remotely to systems in your Milestone Interconnect setup.
Requirements
The remote desktop connections to the computer you want to remote to must be up and running.
- On the central site, expand Servers and select Recording Servers.
- In the Overview pane, expand the required recording server, select the relevant remote system.
- In the Properties pane, select the Info tab.
- In the Remote administration area, enter the appropriate Windows user name and password.
- Once user name and password are saved, click Connect to establish remote desktop connection.
- In the toolbar, click Save.
Enable playback directly from remote site camera
If your central site is continuously connected with its remote sites, you can configure your system so that the users playback the recordings directly from the remote sites. For more information, see Milestone Interconnect setups (explained).
- On the central site, expand Servers and select Recording Servers.
- In the Overview pane, expand the required recording server, select the relevant remote system. Select the relevant interconnected camera.
- In the Properties pane, select the Record tab, and select the Play back recordings from remote system option.
- In the toolbar, click Save.
In a Milestone Interconnect setup, the central site disregards privacy masks defined in a remote site. If you want to apply the same privacy masks, you must redefine it on the central site.
Retrieve remote recordings from remote site camera
If your central site is not continuously connected with its remote sites, you can configure your system to store remote recordings centrally and you can configure retrieval of remote recordings when the network connection is optimal. For more information, see Milestone Interconnect setups (explained).
To allow users to actually retrieve recordings, you must enable this permission for the relevant role (see Roles settings).
To configure your system:
- On the central site, expand Servers and select Recording Servers.
- In the Overview pane, expand the required recording server, select the relevant remote system. Select the relevant remote server.
- In the Properties pane, select the Remote Retrieval tab and update the settings (see Remote Retrieval tab).
If the network fails for some reason, the central site misses out on recording sequences. You can configure your system to let the central site automatically retrieve remote recordings to cover the down-period, once the network is reestablished.
- On the central site, expand Servers and select Recording Servers.
- In the Overview pane, expand the required recording server, select the relevant remote system. Select the relevant camera.
- In the Properties pane, select the Record tab, and select the Automatically retrieve remote recordings when connection is restored option (see Devices that support pre-buffering).
- In the toolbar, click Save.
As an alternative, you can use rules or start remote recording retrievals from XProtect Smart Client when needed.
In a Milestone Interconnect setup, the central site disregards privacy masks defined in a remote site. If you want to apply the same privacy masks, you must redefine it on the central site.
Configure your central site to respond to events from remote sites
You can use events defined on the remote sites to trigger rules and alarms on your central site and thereby respond immediately to events from the remote sites. This requires that the remote sites are connected and online. The number and type of events depend on the events configured and predefined in the remote sites.
The list of supported events is available on the Milestone website (https://www.milestonesys.com/).
You cannot delete predefined events.
Requirements:
- If you want to use user-defined/manual events from the remote sites as triggering events, you must first create these on the remote sites
- Make sure that you have an updated list of events from the remote sites (see Update remote site hardware)
Add a user-defined/manual event from a remote site:
- On the central site, expand Servers and select Recording Servers.
- In the Overview pane, select the relevant remote server and the Events tab.
- The list contains the predefined events. Click Add to include user-defined or manual events from the remote site in the list.
Use an event on a remote site to trigger an alarm on the central site:
- On the central site, expand Alarms and select Alarm Definitions.
- In the Overview pane, right-click Alarm Definitions and click Add New.
- Enter values as needed.
- In the Triggering Event field, you can select between the supported predefined and user-defined events.
- In the Sources field, select the remote server representing the remote site that you want alarms from.
- Save the configuration when done.
Use an event on a remote site to trigger a rule-based action on the central site:
- On the central site, expand Rules and Events and select Rules.
- In the Overview pane, right-click Rules and click Add Rule.
- In the wizard that appears, select Perform an action on <event>.
- In the Edit the rule description area, click event and select between the supported predefined and user-defined events. Click OK.
- Click devices/recording server/management server and select the remote server representing the remote site that you want the central site to start an action for. Click OK.
- Click Next to get to the next wizard page.
- Select the conditions that you want to apply for this rule. If you do not select any conditions, the rule always applies. Click Next.
- Select an action and specify the details in the Edit the rule description area. Click Next.
- Select a stop criterion if required. Click Next.
- Select a stop action if required. Click Finish.