

Smart map
Smart map (explained)
This feature is only available in certain XProtect VMS systems. For information about the features in your system, see Surveillance system differences.
Smart map lets you view and access cameras at multiple locations around the world in a geographically correct way. Unlike maps, where you had a different map for each location, smart map gives you the big picture in a single view.
Smart map displays alarms if they are triggered by a camera and if the camera is added to the smart map. For more information about adding cameras to the smart map, see Adding, deleting, or editing cameras on smart map.
You can zoom out to see all of your locations in multiple cities, regions, countries and continents, and quickly go to each location to view video from the cameras. For example, you can preview footage from cameras at your sales office in Rome, then zoom out, pan across the world with a single drag, and then zoom in to the cameras in your office in Los Angeles.
One key benefit of a smart map is the spatial reference data behind-the-scenes. For more information, see Geographic backgrounds (explained).
Smart map and search (explained)
While searching for video and related data on the Search tab, you can locate the cameras geographically in the preview area:

When you select a search result, the smart map zooms in on the associated camera in its geographic location. You may need to zoom out to get a better overview of the surroundings.
If the camera is placed somewhere inside a multistory building, an indication of the level of the camera appears:
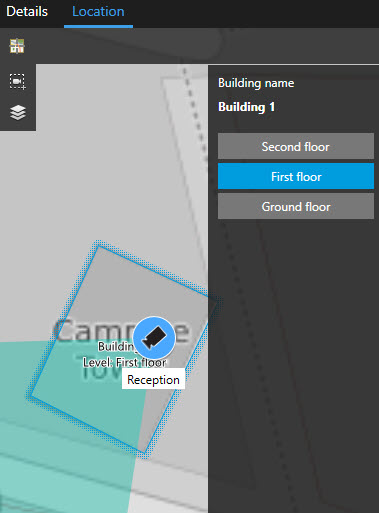
If a camera is visible on multiple levels, only the first level specified is displayed, from the bottom and up.
Zoom in and out
If you have multiple cameras covering the different areas on the smart map![]() A map functionality that uses a geographic information system to visualize cameras, structures, and topographical elements of a surveillance system in geographically accurate, real-world imagery. Maps that use elements of this functionality are called smart maps., the cameras are grouped and displayed with icons. For example, this icon
A map functionality that uses a geographic information system to visualize cameras, structures, and topographical elements of a surveillance system in geographically accurate, real-world imagery. Maps that use elements of this functionality are called smart maps., the cameras are grouped and displayed with icons. For example, this icon  indicates that there are 6001 cameras within the area. As you zoom in, these icons multiply into new icons reflecting how the cameras are grouped and distributed across the smart map - on that specific zoom level. If you zoom out, the number of grouping icons decrease, but the number inside them increase.
Steps:
- Use the scroll wheel or double-click the left or right button on your mouse
- Press and hold the SHIFT key and drag the pointer to select an area on the map. The map zooms in and centers on your selection
With Bing Maps, Google Maps, or OpenStreetMaps as geographic backgrounds, there may be a limit to how much you can zoom in if the services are not able to provide an image at that depth. When this happens, the view item stops displaying the geographic background. Other layers, such as cameras or shapefile images continue to display.
Preview video from one camera
You can preview and investigate video feeds from the cameras on your smart map![]() A map functionality that uses a geographic information system to visualize cameras, structures, and topographical elements of a surveillance system in geographically accurate, real-world imagery. Maps that use elements of this functionality are called smart maps.. If you want to investigate and play back the video, you can open it in a new floating window. In doing so, the smart map will stay in the background in the position where you left it.
A map functionality that uses a geographic information system to visualize cameras, structures, and topographical elements of a surveillance system in geographically accurate, real-world imagery. Maps that use elements of this functionality are called smart maps.. If you want to investigate and play back the video, you can open it in a new floating window. In doing so, the smart map will stay in the background in the position where you left it.
Steps:
- Navigate to the camera.
- To preview the video feed from the camera, double-click it. The video feed is displayed in the Preview window. You can also right-click the camera and select Live preview.
- To play back and investigate the video in more detail, do one of the following:
- Click the Independent Playback button. The controls of independent playback becomes available
- Close the window, and then right-click and select Send camera > New Floating Window
Preview videos from several cameras
You can preview video from several cameras on your smart map![]() A map functionality that uses a geographic information system to visualize cameras, structures, and topographical elements of a surveillance system in geographically accurate, real-world imagery. Maps that use elements of this functionality are called smart maps. at the same time. If you want to investigate and play back the video, you can open the cameras in a new floating window. In doing so, the smart map will stay in the background in the position where you left it.
A map functionality that uses a geographic information system to visualize cameras, structures, and topographical elements of a surveillance system in geographically accurate, real-world imagery. Maps that use elements of this functionality are called smart maps. at the same time. If you want to investigate and play back the video, you can open the cameras in a new floating window. In doing so, the smart map will stay in the background in the position where you left it.
Steps:
- Navigate to the place on the smart map, where the cameras are located.
- To view video from more than one cameras in a preview window, do one of the following:
- Press and hold the CTRL key while you select the cameras, and then right-click a camera icon and select Live preview
- Click
 Select multiple cameras, then click and drag on the smart map to select the cameras. After you select the cameras, press ENTER on your keyboard
 - Double-click a cluster of cameras. You can preview up to 25 cameras in a group. If one or more cameras are selected in the group, the preview window displays video only from the selected cameras
- To play back and investigate the video in more detail, do one of the following:
- In the Preview window, click the Independent Playback button. The controls of independent playback becomes available
- When you have selected the cameras, right-click and select Send camera > New Floating Window
If you chose the cluster option: The icon for the group of cameras indicates whether only some of the cameras in the group are selected, for example  .
.
Use hotspot to view video from cameras on smart map
Instead of previewing video feed from cameras one at a time, or sending the video feed to a secondary display, you can use a hotspot![]() A particular position for viewing magnified and/or high quality camera images in XProtect Smart Client views. to quickly shift between cameras on your smart map
A particular position for viewing magnified and/or high quality camera images in XProtect Smart Client views. to quickly shift between cameras on your smart map![]() A map functionality that uses a geographic information system to visualize cameras, structures, and topographical elements of a surveillance system in geographically accurate, real-world imagery. Maps that use elements of this functionality are called smart maps..
A map functionality that uses a geographic information system to visualize cameras, structures, and topographical elements of a surveillance system in geographically accurate, real-world imagery. Maps that use elements of this functionality are called smart maps..
You have already set up a view with a hotspot. For more information, see Add hotspots to views.
Steps:
- Open the view that contains the smart map.
- If the view also contains the hotspot:
- Navigate to the cameras on the smart map.
- Click the cameras you are interested in. As you click, the video feed is displayed in the hotspot view item.
- If the view does not contain the hotspot:
- In the Views pane, right-click the view that contains the hotspot.
- Select Send View To and select a display option, for example Floating Window.
- Arrange the views on your monitor or monitors so that you can see both.
- Navigate to the cameras on the smart map.
- Click the cameras you are interested in. As you click, the video feed is displayed in the hotspot view item.
Go to smart map locations
You can quickly jump to locations added by yourself or others in XProtect Smart Client instead of panning manually to the location on the smart map. The list of locations displays the last location you selected.
Steps:
- Select the view that contains the smart map.
-
In the upper left corner of the view, open the Select a location list.
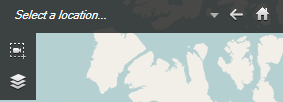
- Select the location to go to that location on the smart map.
Jump to camera on smart map
If you want to view a camera in its geographic context, you can jump to the place on the smart map![]() A map functionality that uses a geographic information system to visualize cameras, structures, and topographical elements of a surveillance system in geographically accurate, real-world imagery. Maps that use elements of this functionality are called smart maps. where the camera is. This is useful if, for example, you forgot the location of camera, or you want to check nearby cameras.
A map functionality that uses a geographic information system to visualize cameras, structures, and topographical elements of a surveillance system in geographically accurate, real-world imagery. Maps that use elements of this functionality are called smart maps. where the camera is. This is useful if, for example, you forgot the location of camera, or you want to check nearby cameras.
You can jump to a camera only if the camera has been geographically positioned in one of two ways:
- The geo coordinates of the camera have been specified in the camera properties in XProtect Management Client
- The camera has been positioned on the smart map in XProtect Smart Client
Steps:
- To search for a camera and then jump to it:
- On the Live or Playback tab, go to the Views pane.
- Search for the camera. If the camera exists, it appears in the search results.
- Hover over the camera you want to jump to.
- Click
 to jump to the camera. The smart map opens in a floating window.
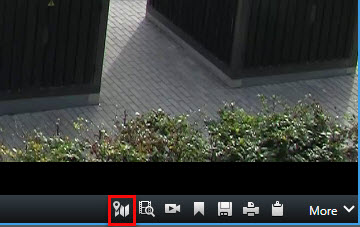
- To jump to a camera from a view item:
- On the Live or Playback tab, select the view item that contains the camera.
Inside the view item, at the bottom, hover over the black bar to make the camera toolbar appear.

- Click to jump to the camera. The smart map opens in a floating window.
Jump to custom overlay on smart map
If you need to quickly navigate to a custom overlay![]() A user-defined, graphic element that users can add to a smart map, for example to illustrate a floorplan in a building, or to mark borders between regions. A custom overlay can be an image, a CAD drawing, or a shapefile. on the smart map, you can jump to the location where the overlay is.
A user-defined, graphic element that users can add to a smart map, for example to illustrate a floorplan in a building, or to mark borders between regions. A custom overlay can be an image, a CAD drawing, or a shapefile. on the smart map, you can jump to the location where the overlay is.
- On the smart map, click
 Show or hide layers and custom overlays. A window appears.
 - Go to the Custom overlays section.
- Click next to the overlay you want to find. This will take you to the location on the smart map.
Backtracking to previous locations (explained)
When you go from one location to another, XProtect Smart Client keeps a history of the locations you visit. This lets you backtrack by clicking ![]() Back. The history is based on the locations that you click. That is, if you pan to a location, but do not click it, the location is not added to the history.
Back. The history is based on the locations that you click. That is, if you pan to a location, but do not click it, the location is not added to the history.
When you backtrack, XProtect Smart Client removes the location you just left from the history. The history includes only forward movements.
The system clears the history when you leave the view.