

Site Navigation: Clients: Configuring Smart Wall
This article describes how to configure XProtect Smart Wall.
XProtect Smart Wall licensing
XProtect Smart Wall requires the following video wall-related licenses:
- A base license for XProtect Smart Wall that covers an unrestricted number of monitors displaying video on a video wall
A base license for XProtect Smart Wall is included in the base license for XProtect Corporate. If you have XProtect Expert, you can purchase a base license for XProtect Smart Wall separately.
Configure Smart Walls
A Smart Wall configuration consists of defining the Smart Wall, adding monitors and defining the monitor layout, and optionally specifying Smart Wall presets and the layout and content of the different monitors.
You need not define Smart Wall presets, if you only want to display cameras and XProtect Smart Client views that your XProtect Smart Client users manually can push onto the video wall.
If you want to use rules to change automatically what is displayed on the video wall, or if you have typical surveillance scenarios where you want to display the same content on the video wall each time the scenario happens, you should define Smart Wall presets.
The configuration of the Smart Wall is very flexible. You can include all monitors on the video wall in one Smart Wall or group the monitors and configure a Smart Wall for each group. Smart Wall presets can change the layout and content of all monitors in a Smart Wall or only some of the monitors. Monitors can be part of several Smart Walls and Smart Wall presets. Create as many Smart Walls and Smart Wall presets you need to optimize the coverage of your typical surveillance scenarios.
a. Define the Smart Wall:
- Expand Client, and select Smart Wall.
- In the Overview pane, right-click Smart Wall and select Add Smart Wall.
- Specify the settings for the Smart Wall.
- In the General View Item Properties settings, define if you want system status information and title bars to appear above the cameras' layout items.
- Click OK.
b. Add monitors and define the monitor layout:
- Right-click the Smart Wall and select Add Monitor.
- Configure the dimensions of the monitor so it resembles one of the physical monitors on the video wall.
- Use the preset behavior settings Empty preset and Empty preset item to define what is displayed on a monitor with an empty preset layout or in a preset's empty preset items when a new Smart Wall preset is automatically triggered or manually selected in XProtect Smart Client. You can use empty presets and empty preset items for content not controlled by the Smart Wall preset.
- Use the preset behavior setting Element insertion to define what should happen when a user of XProtect Smart Client drags a camera onto a layout item in the Smart Wall preset. Select Independent to replace the camera already in the preset item with the new camera or Linked to push the content of the layout items from left to right from where you inserted the new camera.
- Add as many monitors as you have on the physical video wall.
- Select the Smart Wall and on the Layout tab, click Edit to position the different monitors so their positions resemble the mounting of the physical monitors on the video wall.
- Click OK. The same layout is used in XProtect Smart Client.
c. Add Smart Wall presets (optionally):
- Select the Smart Wall and from the Presets tab, click Add New.
- Enter a name and a description and click OK.
- Click Activate to display the Smart Wall preset on the video wall.
- Create as many Smart Wall presets as you need.
d. Add layout and cameras to the monitors (requires a Smart Wall preset):
- Select one of the monitors you created and from the Presets tab, select a preset from the list to configure what you want the selected monitor to show when used with the selected Smart Wall preset.
- Click Edit.
- Click the layout button to select which layout to use with your monitor, and click OK.

- Drag cameras from the Device Groups, Recording Servers or Federated Site Hierarchy tab onto the different layout items. The cameras on the Federated Site Hierarchy tab are accessible in a Milestone Federated Architecture setup. You can leave layout items blank, so they are available for other content not controlled by the Smart Wall preset.
- If the monitor already has a layout for the selected preset, you can click Clear to define a new layout or to exclude the monitor from the Smart Wall preset, so the monitor is available for other content not controlled by the Smart Wall preset.
- Click OK.
- Repeat the steps, until you have added a layout and cameras on the monitors you want to include in the Smart Wall preset.
Set up user rights for XProtect Smart Wall
You can control the tasks that XProtect Smart Client users can perform in XProtect Smart Wall by specifying user rights for roles. The user rights apply to all users who are assigned to the role. For more information, see Roles with Smart Wall rights properties (see Roles settings).
Selections for the Read, Edit, and Delete user rights are always applied. For the Operate and Playback user rights, you can also grant the user rights for a specific period of time by selecting a time profile. For example, this is useful if you want to allow a user to change the content that is displayed on a Smart Wall, but only during their normal working hours.
To specify user rights for a role, follow these steps:
- In the Site Navigation pane, expand Security, and select Roles.
- In the Roles pane, select the role, or create a new role by right-clicking in the pane and selecting Add Role.
- In the upper part of the Role settings pane, select the Smart Wall.
- In the lower part of the Role Settings pane, click the Smart Wall tab, and then select the user rights to assign.
- Read - View Smart Walls in client applications
- Edit - Modify Smart Walls in client applications
- Delete - Delete Smart Walls in client applications
- Operate - Apply layouts on the selected monitor in client applications, and activate presets
- Playback - Review and manage live and recorded video
If you do not select the Playback permission, users can view but not change the content that is displayed on the video wall. If a user makes a change, the system automatically disconnects from the shared state and the content on the video wall is not affected. To return to the shared view, click Reconnect Smart Wall monitor.
- Optional: To grant the Operate or Playback user rights for a specific period of time, select the check box, and then select the time profile.
Using rules with Smart Wall presets (explained)
By combining rules and Smart Wall presets, you can control what is displayed on your video wall in similar way as the system uses rules to control the behavior of cameras and more. For example, a rule can trigger your video wall to display a certain Smart Wall preset during a certain day. You can even use rules to control what individual monitors in a video wall display. See Rules for information about how to create rules.
Example of a rule triggering a Smart Wall preset:

Smart Wall properties
Info tab (Smart Wall properties)
On the Info tab for a Smart Wall, you can add and edit Smart Walls.
|
Name |
Description |
|---|---|
| Name |
The name of the Smart Wall. Displayed in XProtect Smart Client as the Smart Wall view group name. |
| Description |
A description of the Smart Wall. The description is only used internally in the Management Client. |
| Status text |
If selected, camera and system status information is displayed across cameras' layout items on the video wall. |
| No title bar |
If selected, all Smart Wall layout items have no title bars on the video wall. |
| Title bar |
If selected, all Smart Wall layout items have title bars on the video wall. |
| Title bar with live indicator |
When selected, all Smart Wall layout items' title bars display live and motion indicators on the video wall. |
Presets tab (Smart Wall properties)
On the Presets tab for a Smart Wall, you can add and edit Smart Wall presets.
|
Name |
Description |
|---|---|
| Add New |
Click to add a preset to your XProtect Smart Wall installation. Define a name and description for the new Smart Wall preset. |
| Edit |
Edit the name and/or description of a Smart Wall preset. |
| Delete |
Delete a Smart Wall preset. |
| Activate |
Click to display the Smart Wall preset on the video wall. You must create rules with the Smart Wall preset before the system can automatically trigger the display of the Smart Wall preset. See also Using rules with Smart Wall presets (explained). |
Layout tab (Smart Wall properties)
On the Layout tab for a Smart Wall, you position the monitors in your Smart Wall so their positions resemble the mounting of the physical monitors on the video wall. The layout is also used in the XProtect Smart Client.
|
Name |
Description |
|---|---|
| Edit |
Click to adjust the positioning of the monitors. |
| Movement |
To move a monitor to a new position, select the relevant monitor and drag it to the desired position, or click one of the arrow buttons to move the monitor in the selected direction. |
| Zoom buttons |
Click buttons to zoom in/out of the Smart Wall layout preview to ensure you position the monitors correctly. |
| Name |
The name of the monitor. The name is displayed in XProtect Smart Client. |
| Size |
The size of the physical monitor on the video wall. |
| Aspect ratio |
The height/width relationship of the physical monitor on the video wall. |
Monitor properties
Info tab (monitor properties)
On the Info tab for a monitor in a Smart Wall preset, you can add monitors and edit the monitors' settings.
|
Name |
Description |
|---|---|
| Name |
The name of the monitor. The name is displayed in XProtect Smart Client. |
| Description |
A description of the monitor. The description is only used internally in the Management Client. |
| Size |
The size of the physical monitor on the video wall. |
| Aspect ratio |
The height/width relationship of the physical monitor on the video wall. |
| Empty preset |
Defines what should be displayed on a monitor with an empty preset layout when a new Smart Wall preset is triggered or selected in XProtect Smart Client. Select Preserve to keep the current content on the monitor. Select Clear to clear all content so nothing is displayed on the monitor. |
| Empty preset item |
Defines what should be displayed in an empty preset layout item when a new Smart Wall preset is triggered or selected in XProtect Smart Client. Select Preserve to keep the current content in the layout item. Select Clear to clear the content so nothing is displayed in the layout item. |
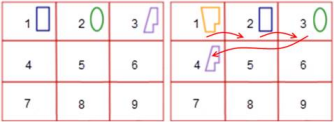
| Element insertion |
Defines how cameras are inserted in the monitor's layout when viewed in the XProtect Smart Client. When selecting Independent, only the content of the affected layout item changes, the rest of the content in the layout remain the same. When selecting Linked, the contents of the layout items are pushed from left to right. If, for instance, a camera is inserted in position 1, the previous camera of position 1 is pushed to position 2, the previous camera of position 2 is pushed to position 3, and so on as illustrated in this example.
|
Presets tab (monitor properties)
On the Presets tab for a monitor in a Smart Wall preset, you can edit the layout and content of the monitor in the selected Smart Wall preset.
|
Name |
Description |
|---|---|
| Preset |
A list of Smart Wall presets for the select Smart Wall. |
| Edit |
Click Edit to edit the layout and the content of the selected monitor. Double-click a camera to remove a single camera. Click Clear to define a new layout or to exclude the monitor in the Smart Wall preset so the monitor is available for other content not controlled by the Smart Wall preset. Click Drag cameras from the Device Groups, Recording Servers or Federated Sites tab onto the different layout items. You can leave layout items empty, so they are available for other content not controlled by the Smart Wall preset. |
 to select the layout you want to use with your monitor in the selected preset, and click
 Was this article helpful?
Thanks for your feedback!