

Events and alarms
Alarms (explained)
This feature is only available in certain surveillance systems. For information about the features in your system, see Surveillance system differences.
On the surveillance server, virtually any kind of incident or technical problem (events) can be set up to trigger an alarm. These can all be viewed from the Alarm Manager tab, which provides a central overview of your VMS incidents, status, and possible technical problems.
The Alarm Manager tab is either displayed or hidden depending on the settings defined by your system administrator.
You cannot set up alarm triggers in the XProtect Smart Client, this is done by the surveillance system administrator as part of the surveillance system configuration.
The Alarm Manager tab provides a dedicated view for your alarm or event handling. The tab itself displays the number of active alarms (up to nine—more alarms than this are shown with a 9+)  . The Alarm Manager tab includes an alarm list, an alarm preview (for previewing video associated with individual alarms or events), and, if available, a map position (for geographical display of alarm indicators). Click the Report button, to display relevant reports on the incidents (see View alarm reports).
Alarm list (explained)
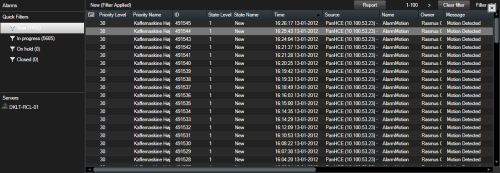
The Alarm list displays incoming alarms by default, with the most recent alarms at the top of the list. Alternatively, the alarm list can display a list of MIPShort for "Milestone Integration Platform". plug-in and analytic events, for example, access control or license plate recognition. To see a list of events, in setup mode, define that the alarm list displays events (see Alarm list settings). Alarms or events that have video associated with them are listed with an icon  . To preview a still image from the time of the alarm or eventA predefined incident occurring on the surveillance system; used by the surveillance system for triggering actions. Depending on surveillance system configuration, events may be caused by input from external sensors, by detected motion, by data received from other applications, or manually through user input. The occurrence of an event could, for example, be used for making a camera record with a particular frame rate, for activating outputs, for sending e-mails, or for a combination thereof., place your mouse over the icon. To preview recorded video from the camera or cameras associated with the alarm or event, select the alarm or event in the list. To stop a repeating alarm sound, select the alarm associated with the sound in the list.
You can decide how you want the list to display, you can filter the columns, you can drag the columns to different positions, and you can right-click to show or hide certain columns.
The event list does not display system- or user-generated events, such as motion detection or archive failure.
The list is updated every 3 seconds.
Servers in alarm list (explained)
On the left side of the alarm list, you can view the servers that the alarms originate from. Many surveillance systems only have a single server, but some systems may consist of several servers in a hierarchy. All the servers you have access to are listed. In the alarm filters, you can filter alarms by servers.
Alarm states (explained)
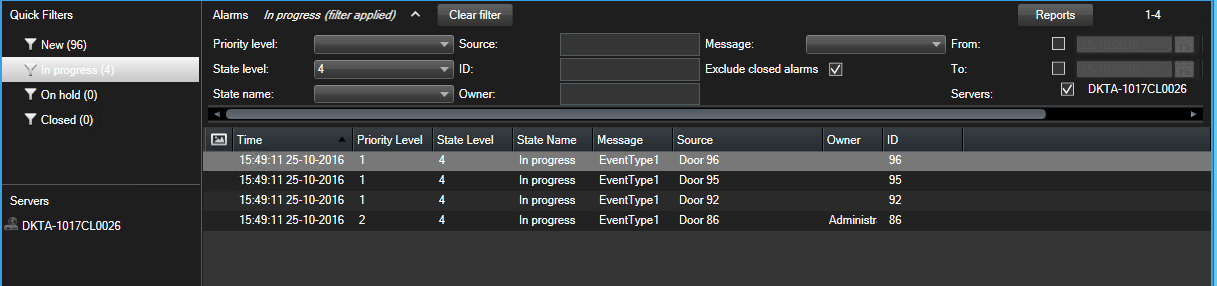
Alarms can be in one of the following states: New, In progress, On hold, or Closed . You can see the state of each alarm in the Alarm List, in the State Name column. The Filters pane lets you filter according to certain criteria (see Filter alarms). Initially, all alarms will be in the New state, but when an alarm is being handled, its state is updated.
Filter alarms
There are several ways you can filter the alarm list, so it displays just the alarms or events that you are interested in.
Steps:
-
In the toolbar of the alarm list, click the Custom (filter applied) or No filter text. The text may differ depending on the filter selected.
- Enter filter criteria on any of the columns you want to filter on. For example, if you enter a user ID in the ID field, the list will only display alarms assigned to that particular user.
- You can combine filters, for example State name and Owner (assigned to).
- To return to the unfiltered alarm list, click the Clear filter button.
- To sort the alarm list's content, in the alarm list, click the title of the column.
If your alarm handling views contain map content, you can also filter the alarm list by right-clicking an element (camera, server, or similar) on the map, then selecting Show Alarms. This will make the alarm list show only alarms from the selected element.
Responding to alarms
Viewing and editing details of an alarm
You can respond to alarms in different ways. You can go to any view where you have added the Alarm List and double-click an alarm. The alarm opens in a separate window, where you can preview the alarm incident and live video. You can also respond to the alarm by changing the fields in the table below.
Depending on how your VMSShort for "Video Management Software". system is configured, you may also receive alarm desktop notifications. Such notifications stay on your screen for 15 seconds. When you click a notification, it takes you directly to the Alarm Manager tab and opens the alarm window.
| Field | Description |
|---|---|
|
State |
The state of the alarm indicates if someone has addressed the event. You can change the state of the alarm. Typically, you would change the state from New to In progress, and then later to On hold or Closed; but if required you can also change state from, for example, On hold to New. |
|
Priority |
Lets you change the priority of the alarm. |
|
Assigned to |
Lets you assign the alarm to a user in your organization, including yourself. The person to whom you assign the alarm becomes the owner of the alarm, and will be listed in the alarm list's Owner column. |
|
Comment |
Write comments and remarks that are added to the Activities section. Comments typically relate to the actions you have taken. For example, “Suspect detained by Security,” or “Suspect handed over to police,” or “False alarm.” The comments field appears at the bottom of the window. |
|
Activities |
The activities summarize how you have handled the alarm. Any changes you or your colleagues make to alarm state or priority, any reassigning of alarms between users as well as any comments added will automatically be included in the Activities section. Depending on the configuration of the surveillance system server, the alarm can contain instructions about what to do when receiving the alarm. The instructions are defined on the server side as part of the alarm definition. When that is the case, the activities are automatically displayed when you edit the alarm. |
|
|
Lets you print a report that contains information about the alarm, such as the alarm history and a still imageA single static image. from the time of the alarm, if an image is available. |
Acknowledge alarms
When you have received an alarm, you can acknowledge it to record that you will do something about it.
Steps:
-
In the alarm list, right-click the alarm and select Acknowledge. The alarm state changes to In progress.
You can only acknowledge new alarms.
- To acknowledge multiple alarms simultaneously, press and hold down the CTRL key, and then select the alarms you want to acknowledge.
- Double-click an alarm to edit the details of the alarm, for example assigning the alarm to someone and adding instructions.
Disable alarms
If you know that certain activity is causing false alarms, you may want to disable alarms on this type of activity for a period of time. This can make it hard for you to see the real alarms that you need to address. For example, if there is a lot of movement around a particular camera and this is generating several false alarms, you can disable alarms on motion detection for this camera for 10 minutes.
- In the Alarm list, select the alarm.
- Right-click it and select Disable new alarms.
- In the Disable alarms window, specify how long you want to disable the alarm.
Ignore alarms
On a map, you can ignore an alarm for an element for a duration of time. For example, if a camera is being repaired and therefore disconnected, you might want to ignore the error showing up on the map during the repair. When you ignore an alarm on a map, this does not remove the alarm from the alarm list, just the map.
Close alarms
After acknowledging an alarm, typically you assign it to someone who investigates what is going on. During that time, the alarm will be in the state In progress. After handling the alarm, you can close it.
To close an alarm, in the Alarm List, do one of either:
- Right-click the alarm and select Close.
- Double-click the alarm, and in the State list, select Closed.
Print alarm reports
You can print a report with information about the alarm, including the alarm history and, if available, a still image from the time of the alarm. If you have selected multiple alarms in the alarm list, you cannot use this feature.
Steps:
- In the alarm list, right-click the alarm.
- Select Print. A window appears.
- To add a note, enter the text in the Note field.
- Click the Print button.
View alarm reports
Alarm reports are available only if you are using XProtect Corporate, XProtect Expert, XProtect Professional+, or XProtect Express+.
- Click the Report button to open the Alarm Report window, where you can view two graphs representing one of the following predefined reports:
- Category
- State
- Priority
- Reasons for closing
- Site
- Response time
You can filter the interval of the report, so it displays alarms over a period of 24 hours, 7 days, 30 days, 6 months, or a year.
Select the categories, states, priorities, reasons for closing, sites, or response times to display in each of the two graphs so you can compare these side by side. The graphs display the number of alarms on the vertical axis and the time frame on the horizontal axis.
Alarms on maps (explained)
If your alarm handling view contains one or more map positions, you can view alarms on the maps too. Maps display alarms based on the geographical location of the camera, server or other device triggering the alarms, so you can instantly see where the alarm originates from. You can right-click and acknowledge, disable, or suppress the alarm directly from the map.
Camera elements display video in thumbnail format when you move your mouse over it. When used together with alarms, the graphical elements on maps display white circles around them if alarms occur. For example, if an alarm associated with a particular camera occurs, the graphical element representing that camera will immediately get a white circle around it (1 in the following illustration), and you can then click the camera element and not only view video from the camera, but also handle the alarm through a menu that appears.
If white is not an ideal color for signifying alarms on your maps, you can change this color.
Now, say the camera which has an alarm associated with it, is located on a street level map, but you are viewing a city level map. How will you then notice the alarm? No problem, thanks to hot zones—graphical representations linking different map hierarchy levels together. If an alarm is detected on the street level map, the hot zone on the city level map will then turn white (2 in the following illustration), indicating that there is an alarm on a lower level map—even if there are map levels in between.

To return to an alarm list mode where you can see alarms from more than just the one element, click the required server, priority or state in the alarm list.
Events (explained)
An event is a predefined incident on the surveillance system that can be set up to trigger an alarm. Events are either predefined system incidents or user-specified events (for example, analytics events, generic events, or user-specified). Events are not necessarily linked to an alarm, but they can be.
Typically, events are activated automatically and in the background (for example, as a result of input from external sensors, detected motion or by data from other applications), but can also be manually activated. Events are used by the surveillance system to trigger actions, such as starting or stopping recording, changing video settings, activating outputData going out of a computer. On IP surveillance systems, output is frequently used for activating devices such as gates, sirens, strobe lights, and more., or combinations of actions. When you activate an event from your XProtect Smart Client, it automatically triggers actions on the surveillance system, for example recording on a particular camera with a particular frame rateA measure indicating the amount of information contained in motion video. Typically measured in FPS (Frames Per second). for a particular period of time as well as sending of a mobile phone text message with a predefined incident description to a particular security officer.
Your surveillance system administrator determines what happens when you manually activate an event. Your surveillance system administrator may use the terms event buttons, user-defined events or custom events for manually activated events.
Manually activate events
The list of selectable eventsA predefined incident occurring on the surveillance system; used by the surveillance system for triggering actions. Depending on surveillance system configuration, events may be caused by input from external sensors, by detected motion, by data received from other applications, or manually through user input. The occurrence of an event could, for example, be used for making a camera record with a particular frame rate, for activating outputs, for sending e-mails, or for a combination thereof. is grouped by server, and the camera or device that the event is associated with. You can manually activate an event. There is no confirmation once you have activated an outputData going out of a computer. On IP surveillance systems, output is frequently used for activating devices such as gates, sirens, strobe lights, and more..
- On the Live tab, expand the Event pane.
- Click Activate.
- Alternatively, if available for the camera, click the overlay buttonA button appearing as a layer on top of the video when you move your mouse cursor over individual camera positions in views on the Live tab. Use overlay buttons to activate speakers, events, output, move PTZ cameras, start recording, clear signals from cameras. that appears when you move your mouse over the image.
Hierarchically, global events will appear under the relevant server. If a server is listed with a red icon, it is unavailable and you cannot activate events on it.
Was this article helpful?
Thanks for your feedback!